Friday, February 28, 2014

chocolate chip cookies

I think chocolate chip cookies are one of the first things I learned how to bake on my own.  You know the Toll House recipe?  Mmmmm!  Well a few years back I graduated to Sonlight chocolate chip cookies.  Sonlight is a Christian camp in Pagosa Springs that I never actually attended as a camper, (though Katie did, twice!) I spent time there in the fall for women's retreats.  But it doesn't matter what you are showing up for, Mary almost always makes chocolate chip cookies to welcome you.  And they are the best!  After I talked about these cookies for a couple of years a friend finally copied the recipe out of her Sonlight cookbook and gave it to me.  I have never looked back and I now share the goodness with you!

The recipe makes a lot, so I scoop the cookies onto a wax lined baking sheet and set them in the fridge to harden.  Then store them in tupperware in the freezer for up to a month.  And when the craving hits for warm, chocolat-y goodness, I set a few out to thaw.  It's almost like having one of those insta food things on the Enterprise from Star Trek.  Accept instead of asking the computer for chocolate chip cookies, I ask my Whirpool.

Sonlight's Best Chocolate Chip Cookies

3/4 c. margarine (I sub in unsalted butter)
1 1/4 c. shortening (I use Spectrum organic shortening, it's non-hydrogenated) 
1/4 c. white sugar
1 1/2 c. brown sugar
2 tsp. vanilla
4 eggs
4 tsp. baking soda*
2 tsp. salt
5 c. flour
2 packages chocolate chips (I use 3 cups of chips)

In a large mixing bowl, cream together the margarine, shortening and sugars.  Add vanilla and eggs.  In a separate mixing bowl combine dry ingredients, and gradually stir into the sugar mixture.  Mix in chocolate chips.

Bake for 8 minutes at 350.  Be sure to remove cookies from the oven when they are just set.  If you bake until a dark golden brown the cookies will not stay soft.**

*This recipe is adjusted to the altitude of Sonlight, about 8,000 feet.  You'll get different results at lower altitudes.  To bake these at a lower altitude, first try reducing the amount of baking soda, and increasing the amount of white sugar.  Here in Austin, I've found 3 1/2 tsp. of baking soda, no sugar adjustment, is fine.

**I do bake mine longer, about 12 minutes till they are a light brown.  I have no issues with them staying soft.


2, 3, 4, 5, 6/52

Soooo, the 52 project, do you remember me mentioning that?  One picture a week for a year.  It's been 8 weeks and I have "4" pictures.  I'm not doing so well.  I don't remember to use my actual camera.  I can easily get my iphone out of my bag or back pocket, but people would probably choke on their starbucks if I randomly pulled my big ole camera out at the store or some-such-place to take a snapshot.  All 4 kids love to be photographed, however, Finn winds up being my main subject.  One, because he's so stinking cute.  Two, he's around.  Constantly.  I need to be more intentional about photographing all of the kids.

While I work on that, here's some shots over the last couple of months.


Evie is an outfit planner.  And I thought this one with the rolled cuffs and moccasins was super cute.  I was going for a different angle.  Never did accomplish it.  
But thought this goofy smile pose came out ok.


A messy face after a PB&J.


Finn loves those little mandarin oranges.  You know the ones that are super easy to peel?  Well, Finn didn't think they were super easy the other day.  
(This is more than one, but the faces were priceless!)


Tuesday, February 25, 2014

happy birthday to me

So, I turned 30.  Like 6 months ago.

I've taken 6 months to post as I wasn't thrilled with how my pictures turned out.  My perfectionist side kept editing them.  Specifically I didn't like the ones of me personally.  My photographer was great (seriously, thank you dad for putting up with me while I tried to "pop a pose!") I just thought in my head I looked better (read: thinner) and then when *I* felt that I didn't, well... major delay on the blog.

I know, I know.  You're going to say, "you look great!" and I don't look like a troll, I'll admit that.  I guess I just wanted to look extra special.  And didn't think I did.  But I've been dealing with my issues, I have lots of them, if you tune in here regularly you know this.  And I've decided that whether or not my warped brain thinks I look ok, the point is: I had a great night, with great people and great food!  So at long last, happy birthday to me.  Read on for alll the details!  Like grab a cup of coffee or your lunch as the planning is as much fun to me as the event.  I kind of go on and on.


I think ahead.  Way ahead.  This sometimes creates massive stress, like when I dwell on children leaving for college in less years than they have been alive... but for the most part it works out pretty well as I don't often wait till the last minute to get 'er done.  So I started planning my late September birthday in January.  I knew exactly what I wanted to do, just had to fit it in my proposed budget.  (The farther you plan ahead, the more you can get done on a smaller budget as you can purchase/make a deposit on items over time and watch for sales, rather than all at once when it might not be the best price.)  The BIG idea was to have about 20 friends over for dinner and then watch a movie, all outside on our patio.  I wanted to have a vintage look and lots of flowers!   

I figured I'd make my own invites, dinner and dessert to keep the cost down.  And I would rent tables and chairs, a projector and screen.  I love antique items and wanted to purchase plates, silverware, glasses and linens so I could reuse them.  But that wound up being too expensive, so most of those things went on the rental list as well.  I did buy most of my decor such as votives, lanterns and flower pots, but I purchased them at Ikea and saved a ton.  I also purchased things at World Market and eBay.  I made sure what ever I bought I would reuse and I've gotten my money's worth!  

Sometime around June I realized my budget wasn't going to accommodate my grand plans and I decided to just can the whole thing.  It was a quite a bit of money I had been thinking of spending and I was feeling very wasteful.  Jason talked me out of it, noting I didn't have an 18th birthday party and on my 21st I was pregnant, 25 was shared with Liam's 1st and I should go forth and celebrate just me, the man said I was important too.  (Secretly I think he's a chocolate cake addict and didn't want to me to bail for that reason alone.)  My parents, agreeing with Jason and knowing how much I had been planning and looking forward to everything, happily offered to cover the entire cost of the party so we could ALL celebrate! 

So go forth I did with some adjustments.  The movie got scrapped.  And as I mentioned, the buying for keeps of tableware was switched to renting.  Thankfully my dear friend Elizabeth passed on the name of a fabulous rental company, Loot Vintage Rentals and they had everything my heart could desire!  Seriously, if you ever need vintage items, look no further.  The ladies were extremely helpful, prompt and accommodating.  Austin has so much to offer for events, and it was nice to not have to drive an hour or two for big ticket items.  I got my tables and chairs from Austin Party Central, I highly recommend them as well!  And I was able to purchase my flowers wholesale at Austin Flower Co. and they had such a great selection.  So beautiful.  

September 20th eventually rolled around and my folks came down to help out.  I immediately stuck my dad on a project and he put my photo collage frame together for me.  And my mom was there with moral support as we drove downtown through a downpour the day before my outdoor party to purchase flowers.  Finally after a ton of time on Pinterest, at HEB and Sam's Club, in my kitchen, sitting at my dining room table and wondering what in the world I was going to wear, it was party time!   Enjoy the pictures.  I promise I'm done talking now.   

invitations

It POURED outside the day before the party, but we woke up to perfect weather.  My dad and Jason tried for an hour to yank this thing out so it wouldn't be such an eyesore.  They eventually just turned it around so we didn't have a basket hanging over our heads.


my photo collage

My mother, "Stop taking pictures.  Please go get your dress on.  I hear car doors slamming."

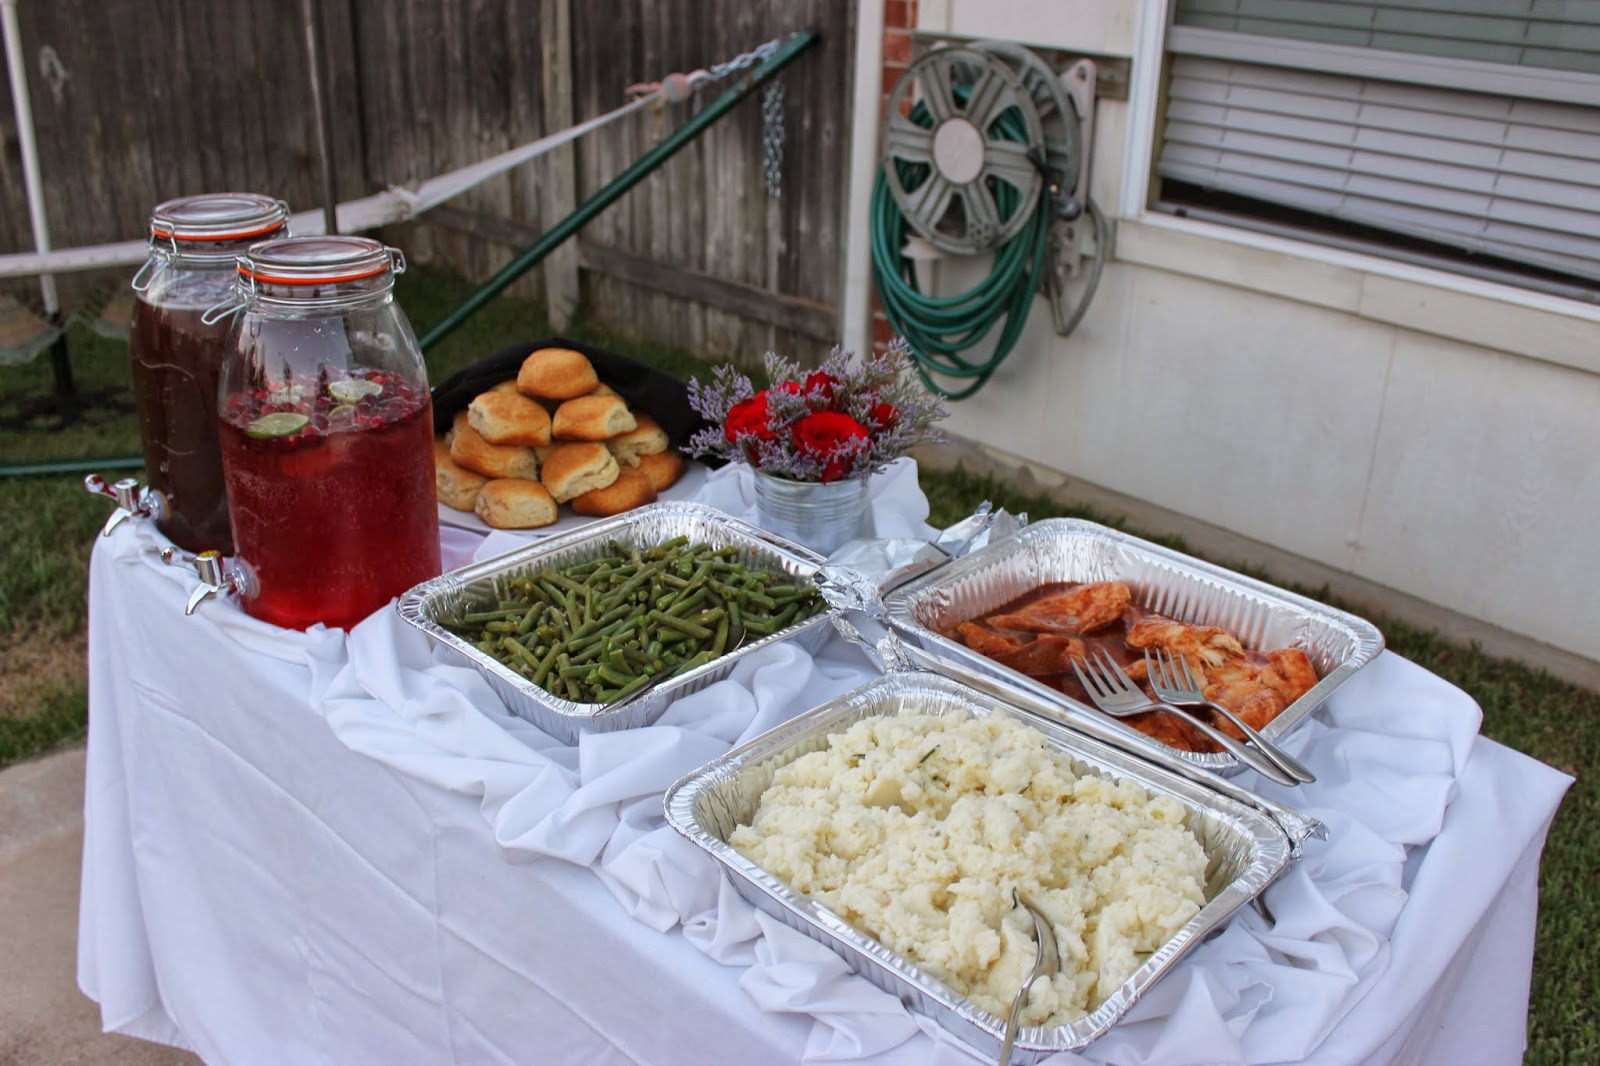
tables, chairs & pink tablecloth~ Austin Party Central


silverware, plates & crocheted cloth~ Loot Vintage Rentals
mason jars & napkins~ my own

my Better Homes & Gardens shot

always buy dresses with pockets.

dress~ Mod Cloth


I invited 20, but there were only 8, however we had a wonderful time!!!

I found this blog and Jason followed their directions and put up string lights for me (for cheap!)

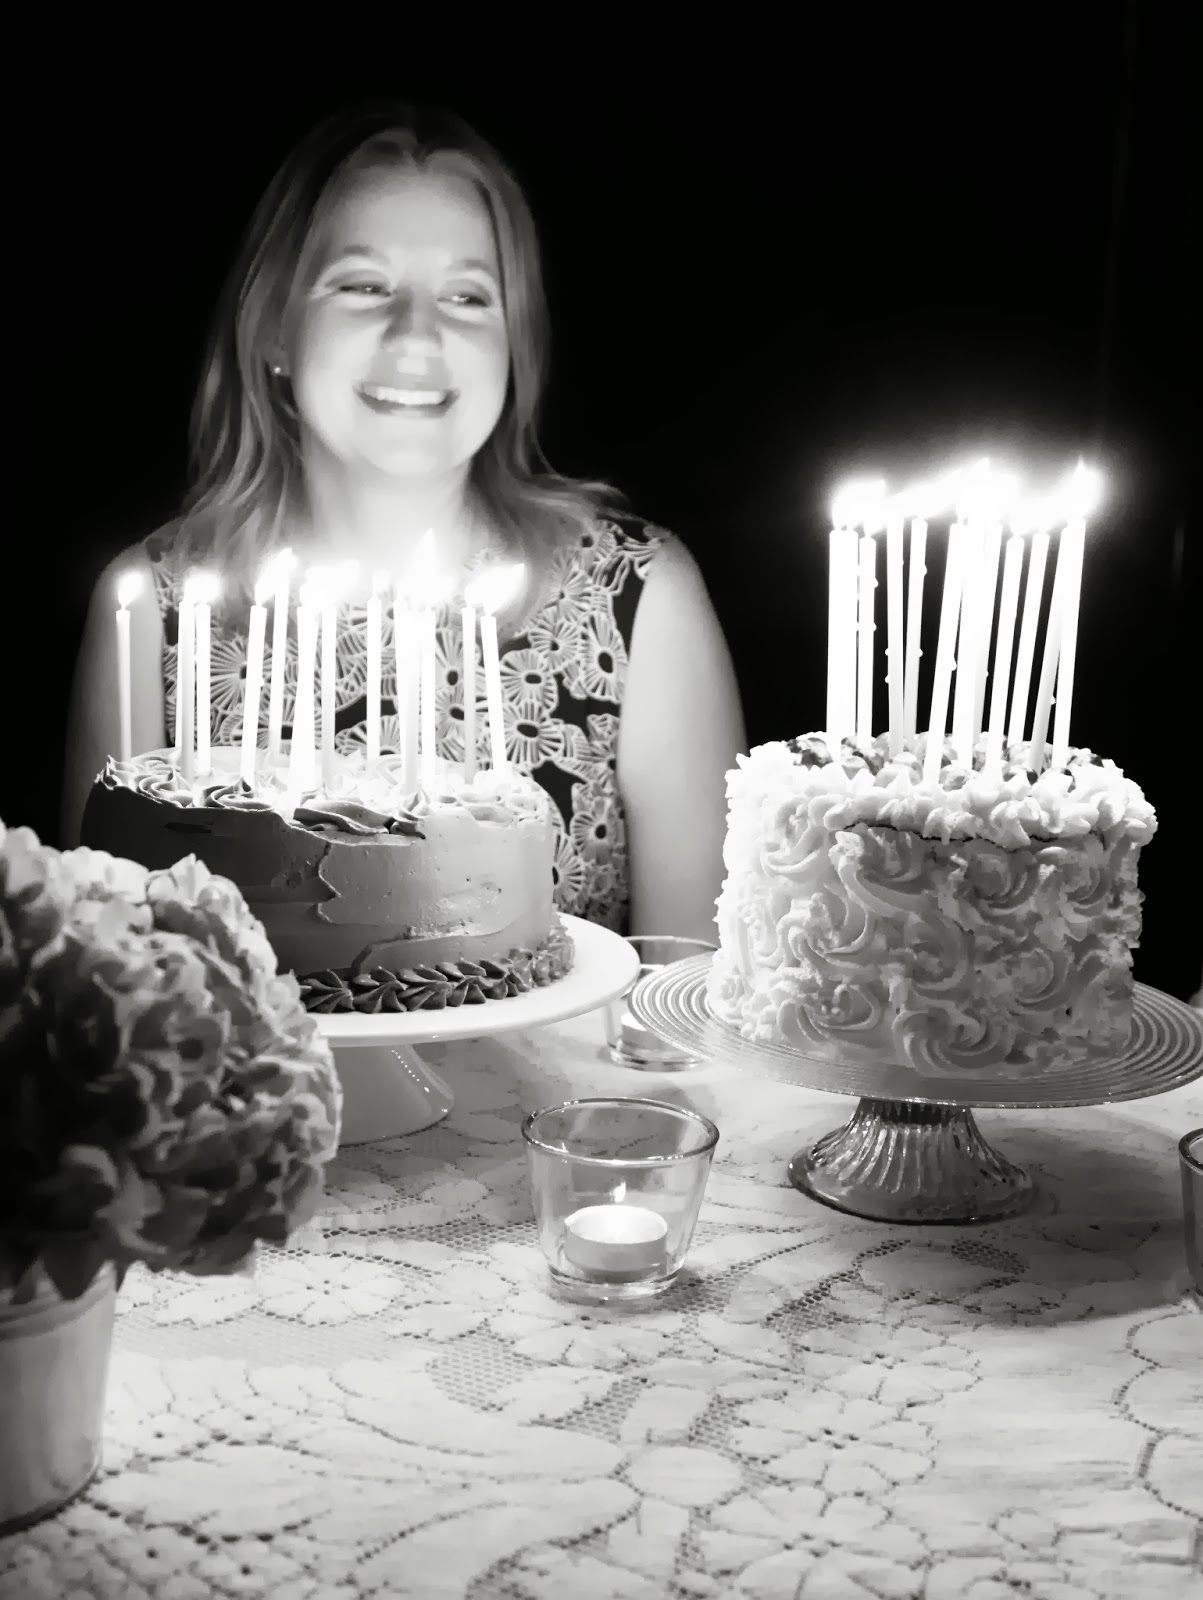
I made both of my favorite cakes.
Chocolate-chocolate and a white cake w/ whip cream icing and red grapes of all things! 

Wednesday, February 12, 2014

garlic & thyme quinoa patties

I posted this picture of my lunch on facebook yesterday-


And I received quite a few requests for the recipe.  If I'd known people would be so interested, I would have taken more pictures.  And made sure I actually had all the proper ingredients.  What I made was sort of a mash up of stuff as I had left over quinoa from the previous nights dinner I wanted to use up.

Here is the original recipe.  (I've included my "hybrid" recipe too.)  Enjoy!

Garlic & Thyme Quinoa Patties
from Cook Republic

2 & 1/2 c. cooked quinoa (cook it according to your packages instructions and let it cool)
5 organic eggs (I used non-organic eggs and 4 of them)
1/2 c. grated parmesan cheese
3 whole meal bread slices, processed into bread crumbs (I used 3 c. panko bread crumbs)
1/4 c. chives, finely chopped (I didn't have any on hand, they taste fine without them)
3 garlic cloves, finely chopped (I use my Pampered Chef garlic press)
1 large Spanish onion, finely chopped (I used 1/2 of a white onion)
1 T. fresh thyme, finely chopped (I used 2 tsp. dried thyme leaves)
1 tsp. paprika
sea salt flakes to taste (I just used boring regular salt, approx. 1 tsp.)

olive oil to pan fry

Combine all ingredients and mix well.  The recipe says to mix with a large wooden spoon, but that means more dishes so I just use my hands.

Scoop up some mixture to shape a pattie, according to Cook Republic, "your patties should be approximately 5cm in diameter and 1cm thick."  Since I don't speak metric, I just scoop up a palm full and shape it into a small patty.

Heat 1-2 T. oil in a large pan on medium heat.  "Gently place" 4-5 patties, or turn your hand upside down and slap the patties in the pan, and shallow fry.  Cook each side for 2-3 minutes or until golden brown.

Repeat until all patties are cooked, use a tablespoon of oil for each new batch.  Makes- 20

Serve hot or cold.  With ketchup.  Which sounds gross and not right after you've just splurged on organic eggs and whole meal homemade bread crumbs.  So I serve them with semi-homemade marinara sauce.

Notes:

From C.R., "these are delicate patties and a tad tricky to shape as they may stick to your hands or fall apart in the pan.  Gentle handling will prevent them from falling apart."

No.  It won't.  These aren't a tad tricky to shape.  They are impossible.  Doesn't matter which recipe you use.  The 6 in the pic above were the best looking ones.  As you shape the patties they just glob up, so be patient and flip them into the pan off your palm carefully so you don't splash hot oil on yourself.  Once one side is cooked, they hold together pretty well.